|
|
Post by Twilight-Claw on Mar 15, 2018 9:49:22 GMT -6
Basic Training Guide For Beginners and Experienced Trainers,
we hope this book will give you all the helpful tips you need,
in order to succeed in training you're creature in the best way possible.
The training guide has been in existence since 13-08-2007 (or even a little before that). Where people first started making a guide for the numerous Abilities and Moves. Tricks back then didn't exist on the scale it does now, nor was there made much emphasize for it, and Abilities and Moves where really only a few dozen back then as well. But over the years they have grown from the few dozen with little guidance on how to teach it. This Guide has started revising somewhere in the 09-01-2018 because of it, and hopefully more guides will be made for what YOU need if your stuck in your training. But on one's own it will take years before it finishes, and with many people willing to help the opposite is true as well. Should you wish to try your hand at making a guide, be sure to keep in mind the sizes of the pet if it needs to be handled just a little bit differently. The trick "Bow" at Mount and Pack Tricks is a excellent example of such a thing, while the tricks "Name" and "Come" at Basic Tricks are the type that there is no need to keep certain sizes in mind while training. So if you feel the need to contact me, for suggestion on what could be improved, added, modified or questions you want to ask on guidance for things that might not exist yet (but I could have a idea on what might help), feel free to pm me. I will try and do my best to help in anyway I can. But I hope a lot of you might be willing to help as well, and be the knight in shining armor for people too! For this guide couldn't be made possible without the help of other trainers willing to pass down their own knowledge of how things might work out. I have also made a question thread for my own (and if people want to use it for making their own guides) questions on how something might specifically works in order to make a guide about it, or if something some form of Ability or different Move('s) might be close enough related to each other that it could be taught right after the first one, and could be included as a side note perhaps. For while some of them might not feel all that related to each other when they could very well be. The question thread heads under the title 'Questions for Guidance' and is located below. [ Click Here] If you want to have a quick link to this book, and want to place it anywhere inside your kennel, journal, maybe even your character's profile? Or anywhere else. I suggest copy/pasting the code down below. A new book has been made, and that means a new look is also much desired, no?  [a href="http://hxrv2.freeforums.net/post/2676/thread"][img]http://i139.photobucket.com/albums/q315/Twilightclaw/Miscellaneous/Training_Guidance.png[/img][/a]
Helpful Tips for Training Tricks ‘I’m a natural!’ Some tricks are things that a pet would do naturally, such as sitting down, hunting, or making noise. When teaching tricks like this, try to think of how your pet naturally does it, and how that can help you teach them to do it on command. It’s usually pretty easy to coax a pet into doing something that is natural for it. Try to use that to your advantage when teaching them. ‘You want me to do what?’ Other tricks are things that a pet wouldn’t do naturally in every day life, like begging for food, or shaking hands (paws) with someone. When teaching tricks like this, you should consider ways to get your pet to do these things. Often, a carefully placed treat, or a gentle nudge is enough to get a pet to catch on. ‘Repeat repeat repeat!’ Repetition is very important in training anything. Nobody gets things perfect the first time, and pets are the same way. While it is true that every pet learns at a different pace, you will still need to make sure they know the command, and know it well. The more you continue to repeat the process, the more likely the pet is to remember it, and associate it with the command you are teaching them. Keep in mind, training takes patience! ‘Monkey see monkey do.’ Often times, a clever or playful pet will try to mimic its owner’s actions. Maybe if you sit down, your pet will be more inclined to do it themselves… ‘Pay Attention!’ Sometimes, the hardest part of teaching a pet is getting it to pay attention to what you’re telling it. Usually, having a treat or eliminating distractions is a good way to get your pet to notice you better. ‘Praise makes perfect!’ Remember to always praise your pet! Try to wean your pets off of actual treats gradually, but never forget to praise them! A warm pat on the head or a scratch behind the ear is good healthy motivation, and a fitting reward. ‘Dos and don’ts of discipline.’ When disciplining a pet who is doing something wrong, make sure not to overdo it. A light swat or a stern word is okay occasionally, but try to focus on positive reinforcement with good deeds, instead of punishment for bad ones. Avoid hitting a pet, or yelling at it. You don’t want your pet to be afraid of you, or attack you, right? Try your best to avoid any form of punishment if you can! ‘Gears and wires and metal, oh my!’ Robot creatures are an especially complicated bunch. They do not eat treats, and they don’t really enjoy a head rub. This makes training them especially hard, because of their lack of motivational objects. Training a robot, however, is deceptively much like training a normal pet. Though you can’t coax them with treats, they have an ingrained will to listen to you, and obey your commands. Try teaching them the same way you would any other pet, but without the treat at the end. A robot pet will usually obey a command, not because it’s expecting a reward, but because that is what it knows it’s supposed to do. Remember! These are only suggestions. There is no one ‘right’ way to train your pets! Everything written here is merely advice for those who seek it, and is not in any way the ‘only’ or ‘official’ way to train your pets. These tips also apply for teaching your pet new abilities it might not have known before, or learn new moves! The information on 'Helpful Tips for Training Tricks' has been taken directly from 'Ultimate Training Guide!' made by Silver.
|
|
|
|
Post by Twilight-Claw on Mar 15, 2018 9:53:34 GMT -6
Register
Considering not everything is placed inside this Training Guide yet (or replacements are being made for it),
you can find the page with the old information located below.
[Click Here]
That page is there for safe keeping for now,
until each of the Tricks/Abilities/Moves is approved,
or ready to be moved inside the appropriate section it belongs.
Sorry for the inconveniences it may cause.
Basic TricksThe most basic of the beginner tricks there is, Name, Sit, Stay are one of the few found in here.19/19 Guides Complete
Final Editing Done: Yes/No
[Click Here]Mount and Pack TricksThe tricks to train a creature that is capable of it to 'carry' a rider or load, even to pull a buggy or sled is found here with all that it entails.
2/16 Guides Complete
Final Editing Done: Yes/No
[Click Here]Aerial and Nautical TricksFor any pet capable of swimming or flying it is for the people who want to train it more 'advanced' tricks than just to let it swim or fly, and makes it for the ones who have trained their creatures to carry a rider, a lot more exciting than the common "Left" "Right" or "up" "Down" tricks you let it learn at the "Mount and Pack" Trick page.. 0/8 Guides Complete
Final Editing Done: Yes/No
[Click Here]Guard and Hunting TricksIt is just like the title says, yet here there is more to be found than just the ones mentioned, it is also the page where one learns to let a pet accept circumstances that can happen suddenly around them, be it a sudden noise or even moving too suddenly for the skittish creatures, it comes in handy everywhere to let a pet learn it.0/14 Guides Complete
Final Editing Done: Yes/No
[Click Here]Messenger TricksThe title is a bit misleading for it isn't just the page where one learns a creature to hold a message in its mouth or claws and brings it to a certain person or location, it is to also let the pet learn to 'Get' and 'search' items that might be lost, even to let it recognize a certain color that might be important to you.0/7 Guides Complete
Final Editing Done: Yes/No
[Click Here]Cute TricksIt is a page with rather diverge selection of tricks that might not be capable to belong on any of the other Trick groups because it either has too little tricks of the same category or really does belong to the tricks that might just make you number 'one' in a contest.0/23 Guides Complete
Final Editing Done: Yes/No
[Click Here]
AbilitiesAll creature, even the more physical inclined can learn new abilities to add to their growing repertoire. Though, those abilities need to make sense to their species anatomy. An example would be that one with no wings can not learn Fly as it isn't within its anatomy to be capable of such a task, if it isn't also listed in their abilities either. BUT, beings who are inclined to an certain element might be able to find a good enough replacement for such an handicap in one of the Move sections.0/104 Guides Complete
Final Editing Done: Yes/No
[Click Here]
ResistanceWhile resistance is an ability, duo to the diversity of elements that this branch has, training a creature to resist the cold is very different to likewise train another to resist fire.0/11 Guides Complete
Final Editing Done: Yes/No
[Click Here]
Physical Moves A note about this Element: Physical is not so much an element, but rather a state of being. All natural creatures in the world are physical. A punch would be considered physical, but then - so would most robots. Metal is usually attributed to physical damage (like a sword), and also so is a natural way of healing (with bandages).A word of caution: The slice and dice section, its best when working with aggressive pets to have some thick protective clothing on you as a lot of these physical attacks if used against you when training are rather sharp and pointy, sometimes even the occasional blunt damage is involved when trying to teach a pet to use it against a Training Dummy. Though, on the other hand this is also the section where you can relatively let a pet learn how to slowly heal its own wounds, or dodge attacks, there are even a few delaying techniques found here for in battle.0/60 Guides Complete
Final Editing Done: Yes/No
[Click Here]Fire MovesA note about this Element: Fire is a fickle thing. It not only has the power to be a scourge upon the land and body, but it also has the power to provide warmth. The soul is often fueled by fire, but fire itself can consume a soul. Flames, infernos, rage, passion, and the ability to warm one's blood. Fire is essential for life. Most people who use fire often abuse it, only thinking of it's ability to harm and ignoring it's ability to help. Those such people are often consumed by it, as fire is a very hungry thing.A word of caution: As this is the section where the unlucky one could get set on fire while training their pet, it is best to wear clothing that doesn't get caught easily on fire (No long loose sleeves for example), and have a pair of Fire Elemental Resistant Gloves on if you need to move their limbs.
It is also best to practice fire moves near the water and have them try aiming their attack on a thick twig drifting on the surface (That way stray fires can be much easier extinguished). Or in a sand environment and have them aim at large rocks if the water makes them too nervous.0/27 Guides Complete
Final Editing Done: Yes/No
[Click Here]Water MovesA note about this Element: Water is the power to cleanse, and it too is a fickle thing. It does not have prejudice in it'd desire to cleanse. It will erode away mountains, carve out the earth into great canyons, clean blood from one's hands, and wash away great cities. All of this can be considered bad, but water is just the power to cleanse. It can cleanse away earth, dirt, blood, hardship, and poison. Many people attribute water as a healing element, but one should never forget it's ability to provide dangerous illusions, nor it's ability to wash away all that you know and love.A word of caution: Bruising and drowning is the only thing you'd need to fear (If at all), it is a rather versatile section as it doesn't deal with just damaging the foe, but also delaying and allowing you or your pet to breath underwater. If you still fear getting pulled under the surface and drown, there is a handy Amulet of Underwater Travel being sold at the Traveler's Emporium to settle your fear.0/26 Guides Complete
Final Editing Done: Yes/No
[Click Here]Earth MovesA note about this Element: Earth is the only sturdy element that never seems to change it's mind. It is rock, it is dirt. It is the solidity of mountains and stones. Earth not only is the ability to swallow up what walks upon it (or in it), but also provides all that grows out of it. Without the earth and stone, you would not have the harvest, nor the trees, and for this, they are grateful, and ally with Earth. They are together, and as one.A word of caution: While most wouldn't think so quickly that Earth is a flexible element for its steadfast nature, it certainly is! While you could get crushed, dehydrated, sliced, or choked if the pet uses it against you (and you better hope it is unwilling to do that to you), it is also the element capable of healing and delaying a great deal more than water ever could hope to accomplish. Thick protective clothing is recommended when training a pet, having a helmed on when teaching it Rock Tomb also wouldn't be remiss.0/44 Guides Complete
Final Editing Done: Yes/No
[Click Here]Wind MovesA note about this Element: Wind is the essence of clarity. The wind may blow, the clouds may form in the sky. May the winds be gale force to push you off your path, or a gentle breeze to bring you cooling comfort on a hot summer's day. Many who seek the ability to look far into the future look to wind as their comfort, as do those who value speed, precision, and the ability to fly. Everything in the sky is under wind's wings, and so generally is the ability to understand things that cannot be seen.A word of caution: The wind can bruise and slice the skin if not handled correctly while training the pet, thick protective clothing that doesn't let the wind through easily is also recommended. While a breeze in the summer can be seen as refreshing on a hot day, too much of it and one can catch a cold. The wind is the element gifted in bringing small temporarily blessings, and a variety of different effects that can not entirely be seen as delaying the foe in combat, not to mention the damage one can do with it in the right hands.0/25 Guides Complete
Final Editing Done: Yes/No
[Click Here]Shadow MovesA note about this Element: Shadow is the absence of light. It is the element of all the creatures that dwell in the darkness, whether they be "bad" or not. However, shadow does have a darker side, if that is possible. Death. Death is not something that is to be feared, but when it comes, the shadows swallow you. Because of this, Shadow is considered to be a bad thing. But what of the more subtle side of shadow? Peace and quiet are friends of the shadow, as is the sacred moonlight. Are they so terrible?A word of caution: While thick protective clothing can always be recommended, in this case it might not always help you depending on what you train your creature with. This element deals heavily into curses affecting the soul, a hard thing to try and protect yourself against when teaching your pet it. The Shadows also deals a lot in delaying the foe or hiding from it and striking at the best opportunity. Should something go wrong when teaching your creature a certain move (or successful in the case of Vengeful Spirit), be prepared to head out to the Healer's Temple for a quick check up, this element is not to be taken lightly..0/34 Guides Complete
Final Editing Done: Yes/No
[Click Here]Light MovesA note about this Element: Light comes not only from the sun, but from the gods they say. Light shines into this world to allow the world to see the beauty in it. Light is considered only to be a holy blessing, and it can heal. Light is the friend of the songbirds and the butterflies, the rainbows, and the crusaders. Crusaders? Oh yes, many consider Light to be the only true and just way of being, and defend it do the death (of all those who do not agree). Light, like Shadow, is a two-sided coin.A word of caution: It is a bit difficult to classify what one might need to protect them from the damage the Light can inflict, as this is the element usually associated with large but brief blessings, the art of purifying and healing. Yet should one face the opposite of it, certain moves may cause burns, temporarily blindness, or wounds inflicted by being sliced open. Depending on which you plan to train it might be a good idea to keep some Healing Salve handy, sunglasses that cover the sides of your eyes, and thick protective clothing so that when one of the 'stray' slice attack such as Crescent of Light hits you, your clothing could offer some minor protection in not making the wound worse then it could have been had you worn a light set of clothing such as a simple T-shirt. 0/34 Guides Complete
Final Editing Done: Yes/No
[Click Here]Acid MovesA note about this Element: Acid is the power to corrupt. Most of the time, when people point their accusing fingers at Shadow, Acid is really to blame. Disease, pestilence, and plague. Sickness, poison, the power of corrosion. Not only of body, but of mind. Poisonous plants and stinging toxins are usually associated with Acid, and other than that people usually pay it no mind. Shadow may be what envelopes you when death happens, but Acid is almost always what causes it.A word of caution: This is a element not to be taken lightly, for it is meant to inflict heavy amounts of pain for long periods over time, very, very few of them are ever meant to cause no serious harm to the target, merely.. delaying them from the inevitable so to speak. Depending on what you teach your pet it is highly recommended to wear Acid Resistant Gloves you can buy at the Supply and Demand shop, wear other clothing as well that is acid resistant when teaching them something related to acid and their ability to damage the skin, should stray drops land on your clothing or skin, wash away immediately with water. Or wear a gas mask when teaching it a move related to exhaling fumes that could poison you just by breathing it in. Keeping either a Antidote Potion for when your teaching minor poisons or a Strong Antidote for those poisons that have a little more 'kick' to them than the average one is also a smart thing to do when teaching a pet that is capable of poisoning you, things like that could even happen on accident should the pet lash out suddenly. A environment covered in sand is the best place to teach pets of this element, as any stray acid drops or poison can be covered up in the sand, and it is less likely for wild animals to stumble upon such a place as it lacks a good source of food or water for most creatures to be inclined to search for it in there. 0/33 Guides Complete
Final Editing Done: Yes/No
[Click Here]Cold MovesA note about this Element: Cold is usually considered to be the power over snow and ice; the opposite of fire. The power to freeze. But that's not where cold stops. Cold has the power to slow down, and even stop (they say) time itself. In the frozen wastelands of the north, you will get blinded and lost within' a blizzard. Time will slow down, and you will become a victim of it. Cold also holds within' it's grasp the power of beauty. How can you not see the snow-drifts, sparkling ice crystals, great glaciers, and icicles and not say that it is a work of art?A word of caution: This element is both beautiful to watch in action, as well as deadly if not taken proper precaution. It deals mostly with shielding you from foes, causing heavy damage in the form of frostbite, and slowing down your foes in order to make them be easier prey to take down in the end. Thick winter clothing, shoes and goggles (for example, when teaching Blizzard) is highly recommended to wear while teaching your pet about this element. Cold Elemental Gloves (that can be bought at Supply and Demand also wouldn't be remiss to have) or simple thick gloves where you have access to all your finger movements would surely be helpful to have in order to prevent frostbitten fingers, and make it easier to grab a treat if you use it to make them be more interested in learning from this element. It is best to try and teach your pet not near any large water source unless truly needed (such as ponds and rivers), for it is very easy for your pet to kill all life in the water environment by having the temperature drop so suddenly. 0/25 Guides Complete
Final Editing Done: Yes/No
[Click Here]Electrical MovesA note about this Element: Electrical is an element all into it's own category. Some would say Electrical power is energy, but many would disagree that Fire is the holder of that title. Electricity is the power of Lightning and Thunder, and is by far the most chaotic Element that exists. The god of Chaos himself favors the Electrical element and so, Madness is also associated with the Electrical element. A word of caution: This is the element that strikes hard and fast, capable of stopping battles before it might have even begun, or slowing down your foes by the nerve damage it might temporarily make, and can be seen as rather fickle for those who want to be blessed with the extra strength it might give. If you got long hair it might be best to braid it in order to not have it get in your way, or use a hydrating shampoo or conditioner that aims to moisturize and de-frizz hair, as static electricity can make your hair go very fizzy when you least want it to and get very annoying when trying to keep the hair out of your eyes. It is also best to use wear thick rubber soles under the shoes, rubber gloves and any other clothing made from that material if it is available. When training a pet any moves with electricity it is best to never do it near a water source, as not only is water conductive to it (because of the ionic impurities in it), it can easily kill all the organism that live in it as well. The best type of environment to teach a pet this element is on a flat surface with several lightning rods (which are at least a quarter underground) evenly spaced and taller then you or your pet to practice on as electricity tends to go for the highest objects nearby if the pet isn't able to control the direction it wants to aim at. When the electricity strikes the lightning rod (which could be made from materials such as copper and aluminum) it will be conducted to the ground and discharges harmlessly. 0/33 Guides Complete
Final Editing Done: Yes/No
[Click Here]Psychic MovesA note about this Element: Psychic is nearly the opposite of physical. It too, is not so much an element, but rather a state of being. Psychic creatures either are physical beings with such great mental powers that they no longer rely heavily on the natural world, or creatures that have surpassed a physical form all-together. Telekinesis is a matter of Psychic power, as is a creature of pure energy and soul.A word of caution: Never take being's capable of bending the mind lightly.
Unlike most of the other Elements you need to have a test subject in most cases to know if a move works, for it is not one usually visible to the eye that shows it is working, and if it does work. Better be prepared for the consequences, and have the test subject be treated at the Healer Temple's for brain damage.0/37 Guides Complete
Final Editing Done: Yes/No
[Click Here]Moves "Above" ElementsA word of caution: Not very much is known about the ones who are "Above" Elements, only that the type of damage they are capable of inflicting is either always very random in element or is done in such a way that it can't truly be described what it might have felt like when getting hit by it, only that something feels very wrong inside the body when no visible wounds can be seen. Consider what you want to teach your pet from this element should they be capable of learning this, and then consider the words of cautions already said with each different element. Try to find from them the best way to protect yourself while teaching it to a pet.0/2 Guides Complete
Final Editing Done: Yes/No
[Click Here]A note about 'this Element('s)' has been taken directly from Introduction to the Elements by Spirit.
|
|
|
|
Post by Twilight-Claw on Mar 15, 2018 9:56:04 GMT -6
Current Projects Being Worked On Currently: Tack Up Next Up: Pull Buggy, Pull Sled, Wear Harness?, Carry Load, Faster/Slower, Turn Right/Left, Stop, Go, Bridle Knowledge
Preview
Tack Up--See spoiler tag on how to put the gear on the creature, or what the specific parts might be--
The first you should do is let the creature familiarize to the presence of the saddle, bridle or any other tack you plan to have it wear like saddle bags for example and begin with light weighted gear and upgrade it to the desired tack (if it isn't already) once the creature is more used and accepting of the current gear. Which could be done by allowing them to smell, see and touch the gear first with their head, show them that there is nothing alarming to the gear itself. Once that is done and the creature is starting to ignore the presence of the gear somewhat, try to put the gear on them. If your creature is the type who tries to walk away when anything is put on them, I would suggest to first collar the creature and clip (that with a metal clasp such as a panic snap which can be disconnected under load if the creature panics and bucks, as the panic snap is specially built so that the latching mechanism is separate from the load-bearing structure. This is so that if the creature panics, and gets caught in the gear such as ropes near the legs which risks injuring the mount if it falls, you or the creature can still perform a quick release to give it more freedom in movement, and hopefully less chance of injury.) that to a leash that is tied against a tree or something else it would be incapable of moving away from. Should the creature still move too much, try tying it between two poles or tree's so that most of the only movement left will be with the hindquarters as it tries to move left or right with it.
Having all the gear you need near you will make things go a lot smoother as you work on having your creature get used to what is placed on the body, instead of having it a be farther away from you.
Have the gear first lightly fastened so that it is more comfortable and less restrictive for now, with the bridle should it have a bit, keep the bit out of its mouth for now.
If it tries to buck to get the gear off, let it try for a few minutes to wear the creature out, and show nothing harmful is happening on its back or head. Should it relax, or stay relaxed after a few minutes reward or praise the creature, than take the gear off and try again after a little while so that it gets used to having gear be put on it. Each time you do it, make it just a little tighter until it is to the point you wouldn't fall off from a loose saddle (or anything you put in the saddle bags would tip the bags sideways and become a annoyance while walking for the creature if one of the bag is on the belly and the other on its back instead of both being at its sides), nor is it so restrictive that it might chafe the creature's skin..
Once that is done you can work on getting your creature used to the bit.
Use some honey or another sticky liquid that the creature favors to give it some taste, the creature would be more happy with taking in the bit into its mouth, but once it is gone may spit it right back out. Keep practising with this so that the creature will relate the sticky liquid to the bit and take it more willingly in its mouth. You can try to encourage it to take the bit by tickling the corner of its mouth with your finger, then when it opens its mouth, introduce the bit with the sticky substance.
In the spoiler tag and about the bit above all information has been found on the websites Wikihow, Wikipedia, Saddleonline, Horseandrider, Horseformula and Saddleupcolorado the word horse has been replaced either with creature or mount in the text.
Images taken from the websites are Horseformula, Theequine.co.uk, Saddleonline, TheFreeDictionary, horsesaddleshop, horse.bigdweb, chicksaddlery, Horsehealthusa and Pininterest by ambulancera7531, warmbloodtackstore, goneriding, Ebay by thesaddles.
If you see text not in Italics that means a link is present in the word('s) there. The Bridle - What it does Image Anatomy of Bridle ![]()
The most common bridle you will see is the basic snaffle bridle shown in the picture above. It has one bit and one set of reins. A true double bridle has two bits and two sets of reins and can offer a finer degree of control of the mount, though it does require cafefull hands to use it. A pelham has two sets of reins but only one bit - the second rein controls the curb chain which lies under the creature's jaw and acts on a reflex point encouraging the creature to flex his head.
There are variations on this basic design which are mostly modifications to the noseband; called flash, drop and grankle nosebands. They all aim to stop the creature evading the bit by providing extra control on his jaw movements, and to some extent have become a fashion item and are often used where not needed.
The bridle is made up from 6 parts
- Headpiece - which passes over the creature's head and ears and supports the bit in the mouth. It is cut from the same piece of leather as the...
- Throatlash - fastens around the gullet of the creature to prevent the bridle slipping forwards. Must not be fitted too tight or will restrict the creature's throat when he bends his head. In reality plays no useful part except for keeping the bridle on should the rider fall off over the front of the creature still holding the reins.
- Browband - a loop across the forehead which stops the bridle slipping back. Should not be too tight or loose as this can be a cause of head shaking in creatures.
- Cheek Pieces - one on each side, attach to the bit and to the headpiece. These are adjustable in length with buckles and are adjusted to hold the bit in the correct position. Many people advocate adjusting the bit until you can see several wrinkles in the creatures lips. We believe this is too much. Just being able to see the bit contacting on the edge of the lips will be much more comfortable for the mount. A bit adjusted too long could bang on the creatures teeth.
- Noseband - not essential for holding the bit in place but can be used to help stop the creature evading the bit.
- Reins - attach to the bit rings beneath the cheek pieces. They should not be so short that you are caused to lean forward to hold them or too long that there is danger of the excess getting caught up in your feet or the saddle.
The Bridle - How to put it on Image Anatomy of Bridle![]()
Most other bridles use straps as well and when it is adjusted to the head, can simple be slid on by first having the noseband in place, then slide the headpiece on the correct spot.
Make sure the collar you are using is at the neck while you're working on putting on the bridle so that it doesn't get in the way, and the collar is capable of being unbuckled and freed from the neck if you no longer need it to have your creature stay put and doesn't get tangled into the other straps. With the reins place it over the creature's head. This is so they don't get tangled in all the other straps on the bridle. The reins will ensure that you will always have control over the creature.
When you attach the reins, always make sure the clips are facing outwards. Having them facing outward will make it so the clips don't rub against your horse's mouth.
Put the crown or headpiece of the bridle over the creature's ears. Some people put it on the farthest ear first, so the ear nearest will easily slide under. When it is placed correctly, the headstall or headpiece of the bridle should be behind the ears, and the brow band should be in front of the ears.
Should the creature have horns, it would be advisable to have the headpiece become a strap with buckle as well in order to put it on.
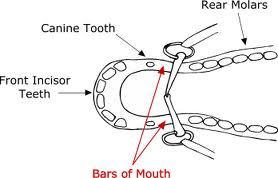
All buckles should face outwards in order to not chafe the creature's skin, and make it easier for yourself to unbuckle the straps. The bit - What it does A bit is a device placed in a creature's mouth, kept on a creature's head by means of a bridle. There are many types, each useful for specific types of riding and training.
When you have a bridle with bit, make sure to choose the right bit, if the bit is too large it wouldn't stay inside the mouth, or hit the teeth continuously, and could very well injure the creature. Not all large creatures need large bits. Image of how Bit looks inside the mouth
The mouthpiece of the bit does not rest on the teeth of the creature, but rather rests on the gums or "bars" of the creature's mouth in an interdental space behind the front incisors and in front of the back molars. The gums are a soft tissue that is full of nerve endings that make this spot extremely sensitive.
It is important that the style of bit is appropriate to the creature's needs and is fitted properly for it to function properly and be as comfortable as possible for the creature.
Image of Bit Anatomy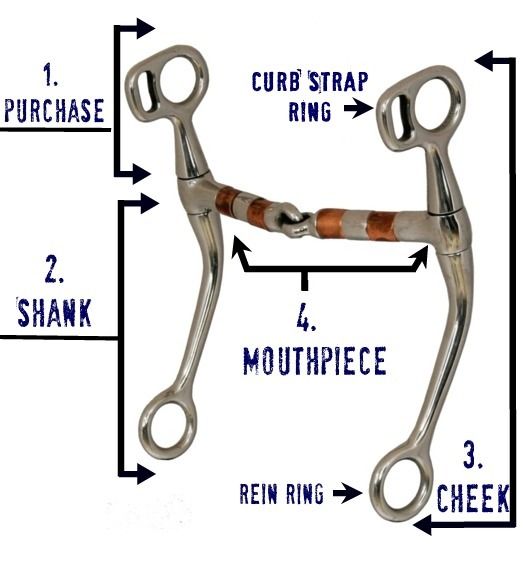 ![]()
Purchase: The purchase is the length between the mouthpiece and where the bridle connects. The shorter the purchase the quicker the bit will react. The longer the purchase the slower the bit will react.
Shank: The shank is the length between the mouthpiece and where the reins connect. The shorter the shank the less leverage you have. The longer the shank the more leverage you have.
Cheek: Side of the bit, including the purchase and the shank.
Mouthpiece: The part of the bit that goes in the horse's mouth.
Image of how different the two Bits look ![]()
While there are literally hundreds of types of bit mouthpieces, bit rings and bit shanks, essentially there are really only two broad categories: direct pressure bits, broadly termed snaffle bits; and leverage bits, usually termed curbs.
Bits that act with direct pressure on the tongue and lips of the bit are in the general category of snaffle bits. Snaffle bits commonly have a single jointed mouthpiece and act with a nutcracker effect on the bars, tongue and occasionally roof of the mouth. However, regardless of mouthpiece, any bit that operates only on direct pressure is a "snaffle" bit.
Leverage bits have shanks coming off the mouthpiece to create leverage that applies pressure to the poll, chin groove and mouth of the creature are in the category of curb bits. Any bit with shanks that works off of leverage is a "curb" bit, regardless of whether the mouthpiece is solid or jointed.
In the wrong hands even the mildest bit can hurt the creature. Conversely, a very severe bit, in the right hands, can transmit subtle commands that cause no pain to the creature. Bit commands should be given with only the quietest movements of the hands, and much steering and stopping should be done with the legs and seat. The bit - How to put it on Hold the crown or throat, noseband, and throatlatch in your right hand so they are out of the way. Offer the bit into the creature's mouth. Put a finger on each side of the bit and gently push against the creature's mouth. If the creature does not take in the bit, it is a good idea to put your thumb in the very corner of the creature's mouth where there should be no teeth and push on the creature's tongue.
To help a shy creature take the bit, put a little honey or peppermint oil on it. Then praise them each time they take the bit to help them get used to it.
Make sure that when putting the bit in the creature's mouth, you do not hit the creature's teeth, or they will become sour to the bit. Also, in the winter, be sure to warm the bit so the creature will not become bit-shy.
The four-footed animal saddle - What it does
--This explanation is used for the most common saddle, but can still be useful for other saddles who have similarities to it--
Proper saddle fit leads to a balanced, safe ride for you, and it lets your creature work comfortably. If your creature pins his ears, flings his head, and wrings his tail while you’re on his back, or if it tries to bite you or the saddle while you’re tacking up, it’s extremely likely that the saddle you’re using fits poorly and causes pain. This is dangerous – and probably uncomfortable – for you, and it can permanently damage your creature's back. Lastly, there’s no way a creature wearing an ill-fitting saddle is able to do his best on the trail or in the show ring. Look for these six signs that your saddle doesn’t fit your creature properly. If it seems like the saddle is a good fit, consult your vet as a health problem could be at the core of his behavior.
Dry Spots
After a moderately strenuous ride, your creature's back should be damp on both sides of the spine. Dry spots (other than the area along the spine itself) are a clear indicator of poor fit. These show that there’s excessive pressure, either on the sweaty areas or on the dry spots themselves. Too much compression can prevent your creature's sweat glands from functioning properly, and it causes serious pain.
If a creature does not possess sweat glands on those spots, be sure to check the other warning signs extra carefully.
White Hairs
When too much pressure is placed on the same spot time and time again, the pressure stops blood from flowing, causes the hair (or perhaps scales to flake off) in that spot to turn white, and kills the sweat glands in the area, if they possess them there.
Temporary Swelling
Just as your ankles will swell if you wear socks that are much too tight, your creature's back may swell if the saddle is putting too much pressure on certain areas. The swelling is caused by restricted blood flow and over time, it could be accompanied by hard spots or muscle atrophy in the areas where the saddle is pinching.
Saddle Sores
While saddle sores can be caused by dirty tack, a dirty mount, or poor balance on the part of the rider, they can also be caused by friction or pressure caused by a saddle that’s too tight, or certain parts of tack that are poorly adjusted or overly tight. Saddle sores are much like the blisters you can get when you’re wearing shoes that don’t fit properly.
Lumps and Bumps
Sometimes creatures develop round, swollen patches about an inch in diameter, which will appear within 15 to 20 minutes of unsaddling and disappear because of reabsorption within about 12 hours. These lumps are not usually painful, but they are indicative of poor saddle fit. Firmer bumps that don’t absorb quickly can also show up, usually along both sides of the spine. These may be slightly uncomfortable. Over time, as poor saddle fit continues, these bumps can become open sores that are extremely painful and are prone to infection. Address issues with bad saddle fit immediately if you see either type of lumps developing.
Tight Muscles
If you run your hand along your creature's back under normal circumstances, it should feel supple and your creature should either not be bothered or show signs it enjoys the massage. If its muscles tense or it tries to get away from your hand, it’s a clear sign that its back is sore, perhaps with bruising that you cannot see.
Correcting Poor Saddle Fit
Sometimes the right saddle pad can improve the way your saddle fits, resulting in an immediate improvement. Sometimes, nothing but a new saddle that fits properly will work. Second, be sure the saddle you choose is a good fit for you! Since poor balance can contribute to a sore back for your creature and pain on your part, you’ll want to ensure that you are riding comfortably.
Image of the most common saddle
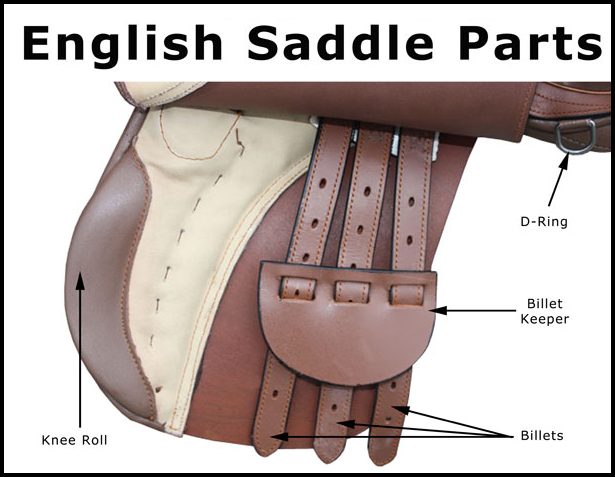
Learning how to correctly name and identify the parts of an English saddle is a basic part of learning to ride. All of the parts of the saddle serve a function that helps make the saddle comfortable and effective.
Pommel: The pommel of the saddle is the area at the front of the saddle where the bars and the gullet of the tree come together.
Cantle: The cantle forms the back of your English saddle. It is also the back of the seat. It is turned up slightly on most models in order to help support the rider.
Seat: The seat of an English saddles is the part of the saddle that the rider sits on while riding. It is located between the pommel and the cantle. English saddles are measured by the size of the seat.
Jockey: The jockey on an English saddle is a small flap of leather that is attached the seat directly over the stirrup bar. It covers the metal stirrup bar and smooth's the transition between the seat and the flap.
Flap: The flap is positioned under the jockey and stirrup leathers on an English saddle. It conceals the saddle's billets and girth.
Gullet: The Gullet of an English saddle is the channel that exists between the bars of the tree. It is positioned directly over the horse's spine.
Twist: The twist is positioned between the pommel and the seat and is identified as the narrowest part of an English saddle.
Panels: The Panels provide cushioning between the back of the saddle and the creature. They are located underneath the seat on the bottom of the saddle on either side of the gullet.
Knee Roll: Not all English saddles have knee rolls. They are an optional feature that is added to the front of the flap and designed to help the rider's leg stay in contact with the flap and prevent the rider's knees from slipping too far forward on the flap.
Billets: There are three billets on each side of an English saddle. They are located underneath the flap and used for attaching the girth to the saddle. It is common to use two of the three billets on either side of the saddle and leave one hanging without anything attached to it.
Girth: The girth is used to hold the saddle on the creature. It is attached to the saddle using the billets and tightened by the rider during saddling so that it holds the saddle on the horse snugly.
Stirrup Bar: The stirrup bar is a small piece of metal that is used to attach the stirrup leather to the saddle. It is positioned directly under the jockey.
Stirrup Leather: The stirrup leather is a leather or synthetic strap that is used to connect the saddle to the actual stirrup. The leather is attached to the stirrup bar.
Stirrup: The stirrup is a triangular metal frame that the rider's foot sits in while riding. The stirrup is also used to help rider's mount and to provide additional support and stability to the rider's leg and leg position while riding.
Stirrups are supports for the rider's feet that hang down on either side of the saddle. They provide greater stability for the rider but can have safety concerns due to the potential for a rider's feet to get stuck in them. If a rider is thrown from a creature but has a foot caught in the stirrup, they could be dragged if the creature runs away. To minimize this risk, a number of safety precautions are taken. First, most riders wear riding boots with a heel and a smooth sole. Next, some saddles, particularly English saddles, have safety bars that allow a stirrup leather to fall off the saddle if pulled backwards by a falling rider. Other precautions are done with stirrup design itself. A number of saddle styles incorporate a tapedero, which is covering over the front of the stirrup that keeps the foot from sliding all the way through the stirrup. The English stirrup (or "iron") has several design variations which are either shaped to allow the rider's foot to slip out easily or are closed with a very heavy rubber band. The invention of stirrups was of great historic significance in mounted combat, giving the rider secure foot support while on horseback.
Saddle Padding: A saddle pad or saddle blanket are inserted under a saddle. These are usually used to keep the creature comfortable, absorb sweat, cushion the saddle, and protect the creature's back by helping to prevent strained muscles, chafed spots, and other injuries. When you pick a saddle pad, be sure that it is designed to work with your saddle as they are also used to alter the balance of a saddle and to compensate for fit problems.
Breastplate Breastcollars or Breastgirths:
Image of the Breastplate and its diagram
It consists of a yoke (with a neck and wither strap), a breast strap at the bottom of the yoke which runs through the horse's front legs and attaches to the girth, and two straps at the top of the yoke which attach to the D-rings of a saddle. There are usually buckles for adjusting the size of the yoke as well as the length of the straps which attach to the saddle and girth. The hunting breastplate not only helps to prevent the saddle from slipping back or sideways. It is also a safety feature, especially on cross-country, should a rider's girth or billets break, they will have enough time to stop the creature and dismount before the saddle is slipping off the animal's back or underneath its belly. - How to put it on
Use a saddle pad, a blanket or cloth, or a foam pad, depending on your specific type of tack.
Place the front of the pad at the front on the creature's withers. The withers are located at the highest part of the back of the animal, behind the neck between the shoulders.
You want to place the pad a bit higher than the withers at first. Once it's placed, slide it down a bit so the horse's hair will not be pushed down in an unnatural position.
Put the pads, and the saddle, on from the same side that you mount the creature, which is usually the left side. The creature will be more used to activity on that side of its body.
Lift the saddle up and place it on the creature's back gently. The saddle should sit in the middle of the saddle pad. If it is sitting correctly on the pad, there will be a thin strip of the saddle pad in front of the saddle.
If you are riding with a English saddle, lift the top of the pad into place so that it is in contact with the underside of the pommel. It should look like there is a little tenting. It's easiest to lift both the front of the blanket and saddle up, so they can come down gently from a few centimeters above the withers.
Once you place the saddle on the creature's back, you should take the time to adjust its location on the creature's back before moving forward with tacking.
Put on the creature's girth. The creature's saddle is connected under its body with a strap called a girth. Attach it to the right side of the saddle first, move to the left side of the creature, and then pull it under the animal's body and attach it to the left side of the saddle.
The girth should be attached in the first and third billet straps if you are using an English saddle.
Some creatures are "girthy," meaning they don't like their girth being tightened. They may attempt to bite you when you tighten their girth, so be cautious about this.
If you are using a breast strap, or rear cinch, now is the time to position them as well.
Make sure the girth is tight enough. Ideally, you should have the girth about 3/4 as tight as you prefer it when you first tighten it. Then move your creature a few steps either forward or back. Next, tighten the girth gradually once again. As a general rule, your girth should be tight enough so that you can fit 2 fingers under it but the saddle won't move easily. Always tighten the girth again once you have warmed up, as creatures tend to puff their stomach out when being tacked up. Remember to check the tightness of the girth right before mounting.
Adjust your stirrups. Once the saddle is on and secured you can adjust the stirrups to the proper length. For most general riding, they should be as long as the distance from your fingertips to your armpit.
If you are going to be riding in 2-point position, meaning you will be in a crouched position with your rear end off the saddle, then the stirrups need to be a bit shorter.
If the stirrup bar is an old type, it may be hinged to lock the stirrup in place. Always keep it down to help prevent being dragged.
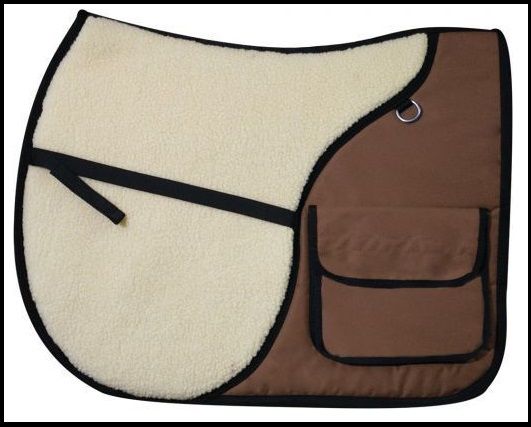
Saddlebags - What it does
Saddle bags let you carry your lunch and other essentials with you when you ride, adding convenience and letting you enjoy yourself more. Did you know that it’s important to pack your saddle bags a certain way? Here are a few tips to make packing up quick, simple, and effective.
Considering the weight distribution is the first thing to be thought about when packing accessories onto a mount. That’s why it’s so important to use saddle bags instead of random bags designed for a completely different purpose. Saddle bags are equally sized, so they balance properly on your creature's back. In addition, they come with extra straps that help prevent bouncing and jarring that could lead to an accident or cause what you stored in the bags to be smashed.
Since saddle bags are dead weight, meaning they can’t adjust themselves on your mount's back the same way you can, equal weight distribution is vital. Without it, your mount is subject to muscle soreness. Additionally, saddles naturally want to slip toward the heavier side – even if the weight difference is minor – and that can lead to discomfort and less safety for you as well as for your partner.
Whether you go with ultra lightweight nylon saddle bags or choose a set of durable leather saddle bags that match your tooled trail saddle, you’ll want to make sure that your bags are of equal weight once they are packed. Weigh them to make sure! If you don’t have a small scale to set your saddlebags on once they are packed, take each one onto your bathroom scale with you. The weight displayed should be the same.
Next, make any necessary adjustments to ensure that your saddlebags weigh as close to the same amount as one another; the maximum difference should be just a few ounces. If it’s impossible to ensure nearly equal weight with only the items you must carry, then add something extra to the lighter saddle bag to even out the weight.
If you have heavier individual items to carry, such as a pair of binoculars, a canteen filled with water, or a heavy camera with a long lens, then you may find it easier to keep that item in a horn bag, where the weight is essentially added onto your own, and where the mount will have an easier time dealing with it, particularly on long rides or over rough terrain. Additionally, these items will be within easier reach, making for a more convenient experience on your part.
Use a cantle bag or cantle straps to carry light, bulky items such as a jacket or rain gear. You can also put gloves inside a cantle bag, along with any other ultra-lightweight items you thing you might want instant access to during your ride.
Once you’ve gained some experience, you’ll find that properly packing your mount's saddle bags – especially when you tend to take the exact same items with you on rides – will become faster and easier over time.
Saddlebags - How to put it on
With riding mounts, saddlebags sit in various positions, on the back, side, or front of the saddle. Most attach to the saddle by straps and ties, and are tied to the D-Rings of the saddle. They can be made from various materials. Although leather was the traditional material, it is heavier and requires more maintenance than many modern versions. There are several types: Pommel bags (which sit in front of the saddle), traditional paired saddlebags (which lie on the hips of the horse, on either side of the cantle), and assorted smaller bags such as a cantle bag (a small tube-like bag that sits just behind the saddle), or a single small saddle bag that may be carried on the off-side (right hand side) of an English saddle.
Pommel Saddle Bags
Also known as the saddle bags you place in front of the saddle.
There are two variations for the most past, a Horn Bag that consists of two small saddle bags connected to each other but with some space between them for a horn opening so that you can slip it on the pommel and use straps to attach it to the D-Rings in order to keep it firmly in place. This can only be done if it actually has a large pommel you could hold onto.
Image of the Horn Bag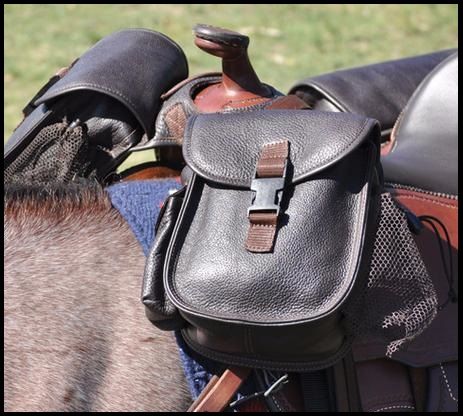 ![]() Horn Bag [/img][/spoiler]
The second one is known as the English Pommel Saddle Bags that can consist of three small bags, where you attach the bags with smaller straps leading to the D-Rings, and longer straps leading to the Girth Billets to hold them firmly in place.
Image of the English Pommel Saddle Bags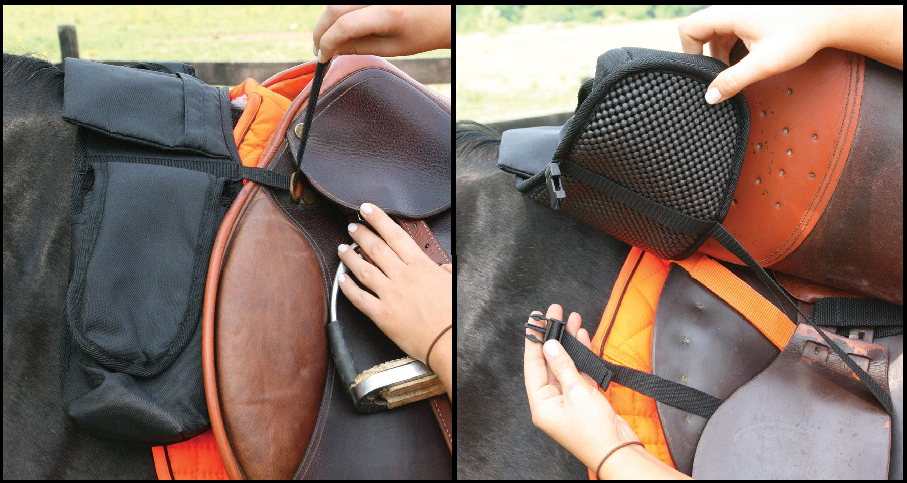 ![]() english pommel bags [/img][/spoiler]
Rear Saddle Bags.
Are placed behind the cantle of the saddle and usually have on each side of the hips one bag, they are attached with smaller straps to the D-Ring and longer ones to the Girth Billets, similar as what you do with the English Pommel Saddle Bags when you look at the image there.
Image of Rear Saddle Bags.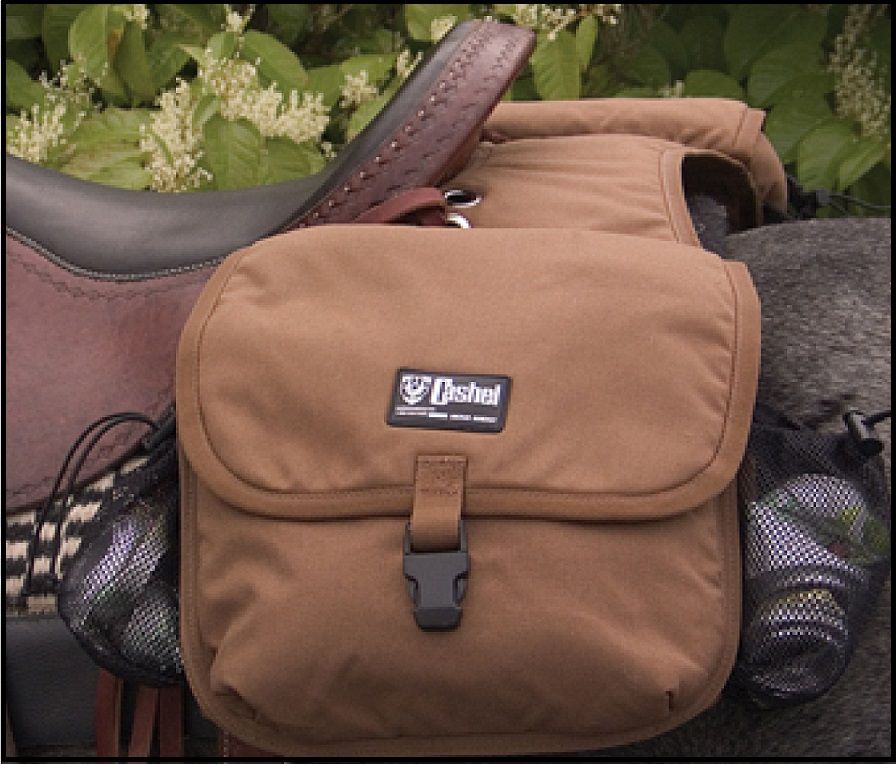 ![]() Rear Saddle Bags [/img][/spoiler]
Cantle Saddle Bag
Is a small tube like bag that you attach to the saddle with small straps leading to the D-Rings close to the pannel.
Image of a Cantle Bag.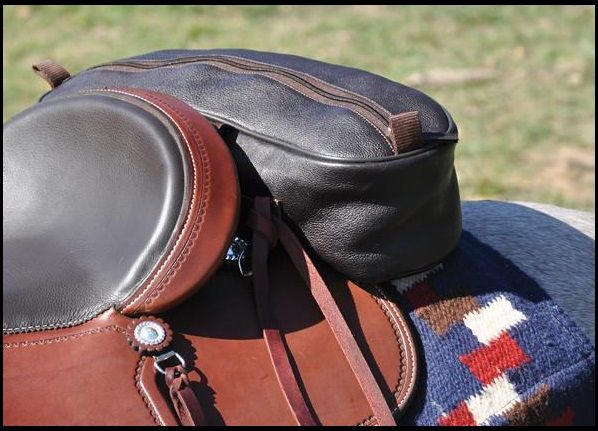 ![]() Cantle Bag [/img][/spoiler]
In-Pad Pouches
Are used primarily for use with English saddles, these saddlebags are actually pouches that are built into the saddle pad. They usually seal closed with hook-and-loop fasteners and hang from the pad's sides, toward the back, where a cantle bag would normally go.
Image of In-Pad Pouches.[/spoiler] [/spoiler] |
|
|
|
Post by Twilight-Claw on Mar 15, 2018 10:36:49 GMT -6
Basic TricksThe most basic of the beginner tricks there is, Name, Sit, Stay are one of the few found in here.
Catch Ever thrown a treat to a dog before, and they try to catch it with their jaws, swallowing it whole when successful? This trick is pretty much like it, you could first give them one treat and once they start paying attention to your hand in which you are holding another one. Make sure the pet stays on one spot and give yourself some distance away from the pet, in the beginning it doesn't have to even be that far, just enough so when your throwing it, it takes the treat at least a meter before reaching the pet in question.
When the pet still has its attention on the treat, throw it slowly in its direction. It might take a while before the pet knows how to learn in catching it in mid-air, as this trick requires eye coordination's with the mouth/hands/claws/etcetera, but once it does, you can move on with larger distances and trying to let it catch other objects out of the air and rewarding the pet with a treat every time it is successful. It would also be best when starting out with the objects you want the pet to catch, to rub the treat against the surface of the object so that the scent stays on it for a little while, and entice them more in catching the object when calling out the command.
Though, the most difficult part of this trick once they are starting to get it, might actually be with weaning them off the treats and still continue doing it for a simple pet on the head or other rewarding system you as trainer use. ~ By Twilight Come I would suggest that you first teach it to 'Stay' so that you won't have trouble teaching them that later, as the creature might think you want it to come towards you every time after they learn this trick.
Before you walk away from the creature let it stay in a specific spot you have in mind, than start walking only a meter away from it in the beginning or when you think you are far enough away from it, look at the creature and hold the reward saying the word come when it pays attention to you while slowly moving your hand with the reward, enticing them to come closer, and when it steps in to your direction reward it by voicing further encouragements and the command your trying to teach your pet. Even if the creature does just one step in your direction and no more, reward it and hopefully the creature will understand it the next time, try this a couple of more times and the creature should learn it, and walk towards you even from a great distance. ~ By Twilight Don't Eat That! Have three treat in your fist and present it to the pet, if it scratches, licks or sniffs at your fist, ignore it, and don't do anything about it. when the pet doesn't pay attention to the treat inside your fist anymore, and looks away, open your fist and take with your other hand one treat, give the pet the treat. Continue doing this for a while till the pet completely ignores the treat. then take it a step further by using a low table (pet should still be capable of easily letting their head rest on it), put a treat on there and have the hand you used previously as a fist cover the treat, again ignore any attention the pet gives to the treat till it starts to ignore it as well, and looks away, only than give the pet the treat with your other hand. In this part you continue taking it a step further by having the hand you use to cover the treat, put more distance between it and the treat. when you don't need to use the hand anymore, you take the last step with the feeding bowl, putting food in it, you lay it right in front of the pet, when the pet tries to get the food without permission, you take the food away, than later put it in front of the pet again. Every time the pet tries it without the 'go ahead' of you, you take the bowl away. Only when the pet waits for the food (not trying to eat from it as soon as it is in front of the pet) give the go ahead. If the pet tries to eat something of the street for example (which you can hardly ignore) and it knows this trick, a simple 'no' to indicate you don't want it to eat that would help. ~ By Twilight FetchBest is to have the creature learn "Come", "Drop" and later "Catch" in the beginning as that way the creature learns to fixate on a thrown object already, and knows how to anticipate when the best time is to catch the object.
Have it start out at a small distance, and let the pet know your holding onto one of its favorite toys, or have the objects smell like one of its favorite treats if toys don't interest the pet all that much. Stand beside the pet and slowly throw the object away from you for a small distance while saying 'catch' you would encourage the creature that way to get a hold of the object you've just now thrown as it smells or is something that interests it greatly to have, and it won't need to walk to far yet to grab a hold of it. Once the pet got the object, say come, and have it drop the object in your hand, then give it a treat or other reward. Repeat the trick each time till the creature does it automatically, then increase the distance and say 'Fetch' while throwing the object. After a while the creature will associate the word with the three actions it performs to bring the object towards you, and you have successfully taught the trick to it. ~ By Twilight FollowYour pet should know "come" before learning this trick.
I find it easier if your pet already knows 'come'. First walk away from your pet and call out 'come' to them then as they walk up to you, start walking away with a treat or something your pet would want in your hand. When the pet starts to follow you as you walk tell them "Follow". Then continue walking for a little bit while saying "Follow". Turn around and reward/praise them. Then repeat. Walk away, tell your pet to 'Come' and then walk away and when they follow you tell them "Follow" ~ By Akina Bellen Get Best is if you want the pet to pick up whatever you want it to get for you "Hold", "Come" and "Drop" first.
Have the pet first learn what the specific object is by pointing at the object and name it with the word 'Get' first just before the pet might try to sniff or come closer to it, if the pet comes close to it and touches it in some way, either with its nose, paws maybe even tail if it has one. Reward/Praise the pet, and move the object a little bit away to try again, keep trying till the pet searches for the specific object to touch it for its reward, then say the objects name and right after it 'Hold', move a little distance away, and say 'Come' when the pet comes to you have it 'Drop' the object in your hand and reward the pet greatly for its effort. Then repeat the commands again till it starts to become more automatically for the pet. Doing the other three tricks before you say it, each time it happens reward the pet, and slowly stop using 'Hold, Come and Drop'. Keep rewarding your pet and when it comes to the point you only need to say 'Get ---' the pet has learned the trick. ~ By Twilight Go AwayBest is to have it know "Come" and "No" first, just so that you won't need to walk towards your pet each time in order to reinforce this trick.
You could try to train it inside a room with the door open, or a enclosure with the gate open if it is a particular large creature. Usually shooing, loud noises, pointing in the direction you want your pet to go into while coming across as threatening tends to make a pet want to get away from you and the weird behavior your doing, and you don't usually have to reward the pet either for going away as it would encourage them to stay close to you just to get that reward, but in the case of creatures who don't get the hint..
Practice with a treat or toy that it likes by throwing it out of the room while saying "Go Away", and when the pet follows the treat or toy, close the door, and wait a few minutes, wait longer incase the pet whimpers for your attentions or does anything else to get your attention.
Once the pet is calm open the door and have the pet come back in the room. Reward the pet, and try again. Keep trying till the pet doesn't seem to do anything to get your attention, and then try with having the door stay open. Each time the pet tries to get inside without you indicating it with a command, give a firm "No" and bar the way with your body till the pet stops and waits.
Wait for a few minutes and have the pet come inside, reward the pet then keep trying again till the pet doesn't enter the room while the door is open and you don't even need to be in front of it either. When that happens your pet has learned the trick. Of course this example is mostly used with pets that can be held in the house, but replace the room with the enclosure and open gate and you can expect the same result from it. ~ By Twilight Lay DownYour pet should know sit before it can be taught ‘Lay down’.
Have your pet sit down and show it the treat, then move it just out of reach of your pets nose and move it down so that they follow, say ‘Lay down’ and if they need some help put a bit of pressure on their shoulder, pushing them down until they are laying down. Praise, and repeat.
For the bigger sized animals such as mounts see the spoiler for tips.
If it is impossible for a mount sized creature to sit (because they might lack the right type of limbs like a snake), it might be best to practice it at the times when they might be going to sleep or are rather tired and prone to lay down and rest because of it. If your planning on doing it somewhere that is rather unfamiliar to them (which can make it more difficult for your creature to willingly go to sleep as it is more wary of its surroundings), or that you and your creature never actually slept there before but you plan to do it at the times it wants to usually sleep. Be sure to grab some kind of blanket or anything else that you can take with you that they usually sleep on, and grab yourself a sleeping bag if the place lacks a bed when you need one, as well as both food and water for you and your creature as it might take a while to learn this trick.
When you're in the area you want to practice with your creature to have it lay down on command be sure to give it some time to familiarize with the area, and place the object (if it has any) the creature usually sleeps on at the most desired spot. You can then start making your creature more comfortable with the area by either playing games or start some different types of training to make it become tired faster, and take some breaks now and then to see if the creature would be more inclined to lay down. If not, keep going or wait till it is the usual time for it to go to sleep.
The moment the creature lays down, say the command and reward it greatly, than have it stand up once again, and wait for it to start laying down once more, rinse and repeat a couple of times. If the creature starts getting irritated with you because it wants to rest, stop, and try again another day, but if the creature starts getting interested in what all the fuss might be about, continue doing it till the creature starts doing it automatically on command.
~ By Bubbles, and Twilight MoveWalk slowly up to the creature and either (when their quite small) push them gently aside with you're feet while saying the command, or use you're hands (when their rather big) to push them aside. Than continue walking a few feet further before you reward the pet. Repeat this till only the simple command 'move' is needed to be said, and the creature moves aside on its own free will. ~ By Twilight NameTo teach a pet their name be sure to have either a favorite toy of theirs handy, maybe if you're staying close to your pet you could give them a scratch behind the ears, or perhaps a treat for when you want to reward your pet? The most important thing is to be patient with your pet as they may in the beginning be easily distracted, but that could in fact work positively for you as well. When you say there name be sure to use a tone of voice you know that would make them look (if only for a few seconds perhaps) in your direction, and reward them when that happens. If the first few times they may not respond to your voice, try changing the pitch or the way you say it in order to get them more curious on why that may have happened, and they might look in your direction then when they try and look for clues. Use that moment to reward the pet when they look at you, after the first success, they will be more susceptible as they try and figure out how to get more rewards from you, and will sooner or later figure out exactly what you want from them when you only reward them when they respond to their new name, instead of when they continuously focus into your direction with hardly a change in expression that they might know what you want from them. ~ By Twilight NoWhen training a creature 'no' you need to keep in mind that you don't need to shout at all. Just a firm, stern 'no' in a low voice, it's not the volume that affects the pets, its how you say something. I suggest you train a pet 'no' while training it other things, if it does something wrong then rebuke the pet. Try and stay calm. ~ By Bubbles No BitesRecommended to teach the move Nip, Bite, Peck or Scratch first, as well as "No".
In no way would this be recommended to stick your hand within very close range to the creature's mouth or claws when you want to teach it not to attack you or anyone else unless it is needed. Instead have the pet fixate on a durable (and large) toy, a long thick stick, or even a very elongated rock if necessary, and command the pet to attack the object your holding on to (best to hold on to the end part, as far away from the creature as possible). Let the pet attack it for a few moments, then either make a disapproving noise you'd always use for this trick, or a simple 'No' and get it out of range once the pet relents either with its jaws loosening slightly, or pausing in between the pecking or scratching of the object. Reward the pet, and try again, make it associate the disapproving noise or 'no' with that you don't want it to continue attacking the object, and try to experiment with having the object in front of the pet, but when it lunges to attack it (as till now you've always said it should do so, but this time didn't) you'll move the object away from your pet while saying 'No' or making the disapproving noise. Mix it up with commanding it to attack the object, or drag it out of range should the pet try to lunge for it before you said anything. If the pet wait for you to command it to attack, even for a few seconds, reward the pet greatly, and have it then attack the object, again reward the pet when it relents after you make the sound. Try to make it that each time it takes longer for the pet to attack the object until commanded, and when satisfied with the amount of time it takes for the pet to pounce on it, you've successfully taught the trick to your pet. ~ By Twilight OffWhen the pet is sitting or perhaps standing on an object you don't want them to be on, there are several ways to get them off it. With an bird or other small creature that can fly and is sitting on you're hand for example, you could lower your arm an couple of inches, than quickly raise your arm in the air while saying the command 'Off', most creature instinctively flap its wings to try and find their balance again. This method makes them dislodge off the hand, but should it not work with the down and up method, one could try the reverse in hope of success. Another method with the pets incapable (or to big for the hand) with flying or even fluttering, is too simple push the pet off the object it is sitting or standing on while saying it than reward the pet when it does what you want, and when the pet is on the object again, repeat the method till you only need to say the word, this trick could be learned in combination with 'Step up'. Also if a gentle approach doesn't work, one could always try and scare the pet with loud noises (clapping the hands close to the pet its face) while saying the command, but doing it that way when the pet has little trust (loyalty) in you, might make the pet scared of you're very presence, and run away. ~ By Twilight SitGently press down on your creatures lower back and say 'sit'. If they refuse to budge push harder while showing them a treat and say 'sit'. Continue to do this until you are putting little pressure on the pets lower back. The pet should eventually get it. Reward it when it does well.
See the spoiler tag for tips on how you could teach pets 'sit' when they reach your chest or higher at the shoulders, the information on mount sized pets was found by watching Elisa Wallace Eventing on Youtube.
For the bigger pets where you might have trouble pushing their hindquarters down while having a treat or toy in your hands I would suggest sticking it to a long pole and raising it in the air just out of their reach. Make sure not to have it be placed too far or else they might try to get it by rearing up on their hind legs, or wait too long with giving them the treat when they do it. If they don't automatically try to sit, use your hand to try and nudge their hindquarters down, or wait for the moment where they try to lay down, usually they first go down with their hind quarters and you can use that moment to praise them just before they lay down, see if with the touch of your hand at their chest they stay in that position. For the really big creatures that are mount size or bigger, you can try it by using a large empty corner, you'll need two bunches of hay stacked on top of each other or other soft material on it that is just about a meter tall as result (with hay it would be best to cover it up in a couple of blankets, so that it doesn't distract the herbivore types or that the hay will feel like needles if there are hard twigs in it), which for most mounts should normally be enough as it is then just a little higher then their Tarsus Bone (kneecaps).
The creature will need to know the trick 'Back' for the best result, as you slowly guide the creature to the corner until it touches the hay or other material you have placed there. Praise or reward it then walk a few steps with your creature away from it and repeat, this is to get it used to having something behind it. Each time try to have your creature get just a little more in that corner and have the front feet come a little closer to its back feet, and reward it each time for its success. The creature will only get more confident and comfortable with having something behind it when it does. At a certain point you can try to have the creature back all the way up in that corner (be calm and patient, it might take a little while as the creature tries to figure out how to put its weight on which legs) and once the creature sits on the material say the command and reward it greatly, repeat it again and again till the creature does it on command , and slowly cut off some of the height from the material your using so that sooner or later the creature will do it on the ground as well.
~ By Bubbles, and Twilight
Stay
What might be helpful is to have the pet know "Sit" or "Lay Down" beforehand.
I would suggest that you first begin with one and a half meter, tell the pet to 'sit' or 'lay down' first, then take a few steps back. Should the pet stay for the first ten seconds reward it, and try again. Each time you go a step further, and if the pet moves towards you despites saying it needs to sit or lay there mark the distance, and have the pet returned to its previous spot then try again. Once you are satisfied with the distance that your pet doesn't move towards you or find something else interesting to do (and thus move away from the spot) try to go for how long your pet stays in the same spot. Have a certain number of minutes in your head as the goal you want to reach, and try to teach your pet to stay within that number of allotted minutes, should that happen you have succesfully taught your pet to stay.. ~ By Twilight
Step Up
The best way to train this trick is to have what you want you're pet to step up on act as an obstacle between the two of you, and lure the pet first on it with a treat (such as with small birds the arm currently not holding the treat and have it a little below eye height). While repeating the word with a few seconds of pause in it. When the pet succeeds, reward it, and let it get off the obstacle (you could try and train the pet 'Off' together with this), than repeat the training till no treat is needed to lure the pet on getting on the object in question, and just saying the command is enough. One last word of advise with this, try and use a hand gesture or tapping on which obstacle you want the pet to step up on, or else you might confuse it when doing it near a lot of similar objects should you use the command. ~ By Twilight
Tolerance
Make sure to wear protective and thick clothing with aggressive pets, as getting bitten or scratched isn't something anyone likes to happen to themselves. Its best to first simple begin with petting and stroking the hide, and gently but slowly lift the appendage (such as a paw or wing for example) with you're hand. If it starts to make a fuss by biting, scratching or trying to get away from you, stop for a moment and simple start petting or stroking the pet again till it has calmed down. Try again when the pet is calm once more, and stop before the moment that it made a fuss, simple let go off the appendage and reward the pet for its good behavior. Repeat this by moving the appendage a step further every time till the pet doesn't mind it anymore. ~ By Twilight
Watch Me
Recommended for the pet to learn its name first, or know of another word or sound that will make the pet look at you, use that and reward the pet when it looks at you, keep stretching the seconds the pet looks at you for this, and reward it each time when it successfully passes the last try. Have a end goal in mind on how many seconds or minutes you want your pet to pay close attention to you, and once it happens that the pet will keep looking in your direction, even if something else might have previously distracted it. Your pet has learned the trick. ~ By Twilight
Wear Harness
Best is to have the pet learn "Stay" and "No" first should the pet be very skittish or prone to trying to squirm out of something.
Its best to first let the pet sniff or touch the harness, let it learn that it is harmless too it and that it isn't anything to be afraid of, the next step will be to carefully put it on the creature. For those pets less prone to panicking you could try and put their head through first and adjust the size till two or three fingers can easily slide under it (This is so that you don't injure the pet when it might be too tight, the first warning sigs that it might be the case is chafing, fur or feather loss, or when the pet is used to wearing a harness that it keeps resisting it), then fasten or click on the neck part should it use that. Repeat the same thing with on the middle belt before clicking or fastening it (and for those prone to escaping try putting on the middle belt first just so that tripping on it will be less likely).
Should the pet try to escape before your done give them a firm 'No' or 'Stay' so that they either stop for the moment or stay in the same spot. Then let go of the pet and allow it to explore with the harness on, for the moment, don't do anything if the pet tries to get it off, not until it might be a successful attempt, keep the pet calm and reward it for good behavior. Have the pet distracted by playing with it or tossing some food on the ground now and then to keep it occupied with searching for food. Should the pet stay calm or has calmed down for a little while, remove the harness for a minute, then try to put it on again. Each time the pet allows it, and your able to fasten or click everything on faster your pet is successfully starting to tolerate having it be placed on them, and coming closer to learning how to deal with it. ~ By Twilight
* High chance of being modified again should either this or "Tack Up" be the one used for "Pull Buggy" and "Pull Sled".
|
|
|
|
Post by Twilight-Claw on Mar 15, 2018 10:48:08 GMT -6
Mount and Pack TricksThe tricks to train a creature that is capable of it to 'carry' a rider or load, even to pull a buggy or sled is found here with all that it entails.
BackWith the mount, aside from knowing "Carry Rider" you'll need to have the "Bridle Knowledge" that implies you have taught your mount to "Go", " Faster/Slower" and "Stop" before this, or else your mount might want to always walk backwards!
Easiest to start with training it with your pet or mount is to stand beside it, and slowly put pressure on the chest area while saying the command or making the type of sound you want to use especially for this trick. Walk slowly backwards with your pet, and after a few steps reward it and try again a couple of times till it starts to respond to the sound. Slowly stop using your hand for it to put pressure on the chest, and when it moves with you without the hand gesture try saying the command while standing still, should the pet or mount do it without you moving with it, reward it and try it a couple more times to be sure it knows what you want it to do.
With the mount try to then sit on its back and say the command to see if it still does what you want, if you don't always want to say the command but want to use your body to have it react to the silent command. It is best to read this article in the spoiler made by Cindy Hale from the website horsechannel.com/horse-training/teach-horse-to-back.aspx
The word horse is replaced with Mount in order to avoid confusion as we have more than one type of animal you can ride on.
Every Mount should back willingly on cue. Not only does this trait come in handy during a variety of all-purpose riding scenarios, but it also demonstrates a certain amount of obedience and submission to the rider’s aids. Yet many riders aren’t quite sure how to tell their Mount to back. Teaching the movement to a novice Mount can be tricky, too. These 10 steps will help you and your Mount shift smoothly into reverse.
1.Make sure your Mount promptly steps forward in response to leg pressure. He must also “give” or yield to pressure from the bit in two ways: by flexing at the poll when you pick up contact with both reins, and by bending laterally (side to side) when you pick up contact using one rein at a time. Without this amount of suppleness, he’ll likely lock his jaw and lean on the bit, resulting in a hopeless tug of war.
2.Have a clear understanding of your goal. You’re going to create energy within your Mount by squeezing with your legs. Usually your horse will respond by stepping forward. But now your hands will act as a barrier. When that energy can’t travel forward, it has to go somewhere. And that somewhere is backward.
3.Since most Mounts will back crooked in the beginning, set yourself up for success by placing your Mount parallel to the rail on the long side of the arena. This will keep his haunches from swinging out to the side in one direction. Later, you can change direction and have the arena rail on the other side of his body. For safety’s sake, be sure you’re a few feet away from the rail. If you hear your stirrups clanking, you’re too close.
4.Ask your Mount to step forward at a lively walk by squeezing with both legs. This creates that initial energy you need.
5.Keep your eyes focused up and ahead. Don’t stare down at your Mount.
6.Increase the contact on both reins until your Mount halts. Though you’ll stop squeezing with your legs, do not take your legs off your Mount's sides.
7.Maintain steady contact with both reins. Wait. Your Mount will contemplate what you want. In response to the steady rein contact, he should flex at the poll.
8.Once he flexes at the poll, squeeze with both legs. Wait. Allow your Mount time to figure out what you want. He has to analyze that you have asked him to move with your legs, yet you’re also restricting him with your hands. His only option? To take a step or two backward.
9.As soon as he completes a few steps back, crooked or not, soften the contact on his mouth. Stop squeezing with your legs. Your horse should not remain motionless at the halt. Reward him with positive reinforcement like a pat, praise or a little treat.
10.Now recreate some energy by squeezing with your legs and traveling straight ahead at a brisk walk, trot or canter before you repeat the exercise. This will keep your Mount from getting stuck in reverse.
Perhaps the biggest error riders make is rushing through the various steps. They get frustrated and try to force their Mount to back by pulling harshly on the reins. Then the Mount resists by flipping his head or rearing. Instead, be patient. Communicate clearly to your Mount and he’ll back up willingly.
~ By Twilight BowWith small animals you can easily use a treat or favorite toy, have one arm under the belly closest to the hind legs and use the treat or toy in your hand to guide your pet's head down to the ground while saying the command, reward when the pet does that and make it stand in a normal position again.
At first the pet doesn't need to lay halfway down just so long as they know to have their head close to the ground, after a while move your hand down but further away from the head so that the pet can't follow your hand too closely and will be forced to bend down in order to become just that little bit closer while you say the command. Once it does that, reward the pet, and try again a couple of times. Each time have your hand that is under its belly be felt a little less when it performs the trick very well, and continue until you don't need to keep your hand under it, or not needing to make the movement with your hand holding the toy or treat when saying the word will be enough.
For Mounts check the spoiler, the information on it I found mostly by watching Ellie Sales from YouTube.
For Mounts the trick will be a little bit differently, make sure you can reach for the treats with one hand.
If you're standing near the right side of your mount pick up with your left hand the front leg of your mount, and bend it towards the belly or hind legs, use your right hand for the treat and move your hand between the front legs, make your mount aware you have a treat in your hand, and let it try to slowly bend its head to the belly while saying the command. Just make sure to encourage it to bend its head first halfway, as it might not understand how to bend completely to the ground in the beginning. Each time try to have the head become a little lower, and more towards the belly, till it finally starts to lower itself to the ground while the knee your holding is still bend. After a little while of trying, and succeeding with this part, have your left hand touching and bending the knee replaced with a whip or stick and lightly touch the knee while saying the command and having your right hand still perform the same motion as previously. Your mount might be a little confused and slower to react as it adjusts to having it carry its own weight while bending down, but be patient with it. Encouraging can help a lot as well!
Should the mount not be into treats all that much you can try this method by first by picking up the front leg and bending it towards the hind legs, while with your other hand you put pressure on its shoulder closest to the chest and have it rock a little backwards so that it starts bending down while saying the command. If your mount already knows 'Back' it will be slightly easier for you trying it this way. Reward it each time it starts becoming successful in bending down, and slowly start using physical touch less and less till the mount can easily do it with only a word being said to it.
~ By Twilight Bridle KnowledgeCarry LoadCarry RiderFancy WalkFaster/SlowerGoGround TiePiaffePull BuggyPull SledStopTack UpTurn Right/LeftUp!
|
|
|
|
Post by Twilight-Claw on Mar 15, 2018 10:54:38 GMT -6
Aerial and Nautical TricksFor any pet capable of swimming or flying it is for the people who want to train it more 'advanced' tricks than just to let it swim or fly, and makes it for the ones who have trained their creatures to carry a rider, a lot more exciting than the common "Left" "Right" or "up" "Down" tricks you let it learn at the "Mount and Pack" Trick page
Barrel RollDiveFlipHigher!HoverLandSubmergeTread Water
|
|
|
|
Post by Twilight-Claw on Mar 15, 2018 10:57:01 GMT -6
Guard and Hunting TricksIt is just like the title says, yet here there is more to be found than just the ones mentioned, it is also the page where one learns to let a pet accept circumstances that can happen suddenly around them, be it a sudden noise or even moving too suddenly for the skittish creatures, it comes in handy everywhere to let a pet learn it.
Accept Blood/Scary SightsAccept DarknessAccept Enclosed SpacesAccept NoiseAccept Sudden MovementsAt EaseCombat CrawlCoverFishingForageGrowlGuardHuntSilence
|
|
|
|
Post by Twilight-Claw on Mar 15, 2018 10:59:53 GMT -6
Messenger TricksThe title is a bit misleading for it isn't just the page where one learns a creature to hold a message in its mouth or claws and brings it to a certain person or location, it is to also let the pet learn to 'Get' and 'search' items that might be lost, even to let it recognize a certain color that might be important to you.
DropGetHoldLocationMessengerRecognize ColorSearch
|
|
|
|
Post by Twilight-Claw on Mar 15, 2018 11:01:55 GMT -6
Cute TricksIt is a page with rather diverge selection of tricks that might not be capable to belong on any of the other Trick groups because it either has too little tricks of the same category or really does belong to the tricks that might just make you number 'one' in a contest.
BegCountDanceFeedHugJump OverJump UpKissLeapNestNo ShakePlay DeadRoll OverShakeSit on ChairSmoke RingsSpeak UpSpin ItemSpoutSurfThrough HoopWaveYes Shake
|
|
|
|
Post by Twilight-Claw on Mar 15, 2018 11:05:04 GMT -6
AbilitiesAll creature, even the more physical inclined can learn new abilities to add to their growing repertoire. Though, those abilities need to make sense to their species anatomy. An example would be that one with no wings can not learn Fly as it isn't within its anatomy to be capable of such a task, if it isn't also listed in their abilities either. BUT, beings who are inclined to an certain element might be able to find a good enough replacement for such an handicap in one of the Move sections.
Acid FangAdaptableAlphaAmphibiousArborealAssimilateAquaticBioluminescenceBlessing of the ShadowsBlindBloodthirstyBlubberBuoyancyCarapaceCavalryCave CrawlerChlorophyllCircuitry ProblemCity DwellerCommanding PresenceComplex ThoughtCorroding BodyDanger SenseDesert-DwellingDiurnal SpiritDouble-HeadedElectrical BodyEmpathetic LinkEnduranceEnigmaticEtherealEternal TearsFaerie FaultFrenzyFlame BodyFloatFlyFlutterForest DwellerGleamGlideHardyHeart of the GuardianHive MindIce BodyIllnessImmobileInfectious BiteIron WillImpermeableIntimidationInvisibilityJungle DwellerKeen MindKeen SensesLava BatheLifelessLight SensitivityLinked Sense XXXLone WolfLoosen Feathers/FurMagical TouchMagicalMagically ResistantMalleable FormMechanical MindMagnetic InfluenceMoist SkinNatural AntivenomNightvisionOpposable ThumbsPacifismPack InstinctsParasitic VirusPerpetual AgonyPhoenix-BloodedPlains-RunnerPoisonous SkinPrehensile Tail/TrunkPrismatic RefractionRefined SensesRunSand SwimSelf-Aware AppendageSlimeSlothSmall StatureSonar SenseSpeakStone SkinSuper-LuckSurvival Instincts or Eidolon EndeavorSwimTelepathyThick FurThorny BodyTundra-DwellingUmbral BondUncontrollable Rage XXXWar TrainedWind AvatarWinter CoatXXX ImmunityXXX Weakness
|
|
|
|
Post by Twilight-Claw on Mar 15, 2018 11:07:02 GMT -6
ResistanceWhile resistance is an ability, duo to the diversity of elements that this branch has, training a creature to resist the cold is very different to likewise train another to resist fire.
Physical ResistanceFire ResistanceWater ResistanceEarth ResistanceWind ResistanceShadow ResistanceLight ResistanceAcid ResistanceCold ResistanceElectrical ResistancePsychic Resistance
|
|
|
|
Post by Twilight-Claw on Mar 15, 2018 11:09:03 GMT -6
Physical MovesPhysical is not so much an element, but rather a state of being. All natural creatures in the world are physical. A punch would be considered physical, but then - so would most robots. Metal is usually attributed to physical damage (like a sword), and also so is a natural way of healing (with bandages).A word of caution: The slice and dice section, its best when working with aggressive pets to have some thick protective clothing on you as a lot of these physical attacks if used against you when training are rather sharp and pointy, sometimes even the occasional blunt damage is involved when trying to teach a pet to use it against a Training Dummy. Though, on the other hand this is also the section where you can relatively let a pet learn how to slowly heal its own wounds, or dodge attacks, there are even a few delaying techniques found here for in battle.
BashBeak BreakBiteBlend-InBody SlamBone ShiftBoundBuckChargeClawClimbConstrictCrunchDashDodgeDrownGashGive WayHeadbuttHibernateJumpKickLick WoundsMaulMetal BiteNibbleNipPeckPinchPlay DeadPouncePummelPunchRegenerateRendScamperScratchShredSickle ClawSlapSnatchSnitchSolidifySteel BlockStingSpurSurprise!SquirmStampStalkStruggleSweet ScentTail SlapTail StrikeThornsVice GripWall-WalkWeb
|
|
|
|
Post by Twilight-Claw on Mar 15, 2018 11:10:44 GMT -6
Fire MovesFire is a fickle thing. It not only has the power to be a scourge upon the land and body, but it also has the power to provide warmth. The soul is often fueled by fire, but fire itself can consume a soul. Flames, infernos, rage, passion, and the ability to warm one's blood. Fire is essential for life. Most people who use fire often abuse it, only thinking of it's ability to harm and ignoring it's ability to help. Those such people are often consumed by it, as fire is a very hungry thing.A word of caution: As this is the section where the unlucky one could get set on fire while training their pet, it is best to wear clothing that doesn't get caught easily on fire (No long loose sleeves for example), and have a pair of Fire Elemental Resistant Gloves on if you need to move their limbs. It is also best to practice fire moves near the water and have them try aiming their attack on a thick twig drifting on the surface (That way stray fires can be much easier extinguished). Or in a sand environment and have them aim at large rocks if the water makes them too nervous.
BalefireBlazeBreathe FireCindering BreathColdflame AuraEmberExplosionFiery SoulFire ShieldFire SpoutFlame BiteFire BurstFire SpearFlame ClawsFury AspectHeat WaveHot BreathImmolationInfernumInner WarmthLava BurstLava SpearLava SpitProvide WarmthSmokeSmoldering GoopSpirit Flame
|
|
|
|
Post by Twilight-Claw on Mar 15, 2018 11:12:29 GMT -6
Water MovesWater is the power to cleanse, and it too is a fickle thing. It does not have prejudice in it'd desire to cleanse. It will erode away mountains, carve out the earth into great canyons, clean blood from one's hands, and wash away great cities. All of this can be considered bad, but water is just the power to cleanse. It can cleanse away earth, dirt, blood, hardship, and poison. Many people attribute water as a healing element, but one should never forget it's ability to provide dangerous illusions, nor it's ability to wash away all that you know and love.A word of caution: Bruising and drowning is the only thing you'd need to fear (If at all), it is a rather versatile section as it doesn't deal with just damaging the foe, but also delaying and allowing you or your pet to breath underwater. If you still fear getting pulled under the surface and drown, there is a handy Amulet of Underwater Travel being sold at the Traveler's Emporium to settle your fear.
Aqua MirageBig BubbleBlow BubblesBubble SprayCall the RainsDelugeDouseFountain SprayHealing DropHidden MistHydro JetHydro SphereHydro ShellInk JetIntangible BodyMist BurstMist SpearSphere of LifeSquirtTidal CrashWalk on WaterWater BreathingWater BurstWater SpearWave of MuckWhirlpool
|
|
|
|
Post by Twilight-Claw on Mar 15, 2018 11:16:50 GMT -6
Earth MovesEarth is the only sturdy element that never seems to change it's mind. It is rock, it is dirt. It is the solidity of mountains and stones. Earth not only is the ability to swallow up what walks upon it (or in it), but also provides all that grows out of it. Without the earth and stone, you would not have the harvest, nor the trees, and for this, they are grateful, and ally with Earth. They are together, and as one.A word of caution: While most wouldn't think so quickly that Earth is a flexible element for its steadfast nature, it certainly is! While you could get crushed, dehydrated, sliced, or choked if the pet uses it against you (and you better hope it is unwilling to do that to you), it is also the element capable of healing and delaying a great deal more than water ever could hope to accomplish. Thick protective clothing is recommended when training a pet, having a helmed on when teaching it Rock Tomb also wouldn't be remiss.
Arid BiteBrew SandstormBurrowChoking VinesCrystalline PowerCureCure PoisonDepth's HoldDigEarthen AspectEarth BurstEarthshakeEarth SpearFissureGroundedHealing BerryLava SpitLeaf StormLiving SeedMetal BiteOvergrowthPlague of InsectsPlant BurstPlant SpearPollen DustRake the EarthRapid BloomRegenerateRegrowthRock ShieldRock TombRootSand BurstSand SpearSapSeed SpitShield of StoneSporeSummon Wooden SpearSweet ScentVerdant GrowthVerdant WhisperWave of MuckWooden Spear
|
|